GUN COMBAT INTRODUCTION
Combat comes in many forms, one of those being gun combat which will be very common here on Biohazard. The system itself is fairly simply to understand, using dice to introduce the variables that are undoubtedly present when using a long range weapon like a gun. Upon firing a weapon you will need to make a d20 roll to see if your bullet(s) strike your target (the outcome depends on your skill with a firearm, use the table below to check), you must roll individually for each bullet. If a bullet does strike the target you must then make a d100 roll to see exactly where on the target you hit (again, skill with a firearm is key to determine the outcome, use the second table below for to determine where your bullets hit), the outcome of this roll will determine how much damage your attack does.
~~~~~~~~~~~~~~~~~~~~~~~~~~~~~~~~~~~~~~~~~~~~~~~~~~~~~~~~~~~~~~~~~~~~~~~~~~~~~~~~~~~~~~~~~~~~~~~~~~~~~~~~~~~~~~~~~~~~~~~~~~~~~~~~~~~~~~~~~~~~~~~~~~~~~~~~~~~~~~~~~~~~~~~~~~~~~~~~~~
 BODY AREA DAMAGE BODY AREA DAMAGE
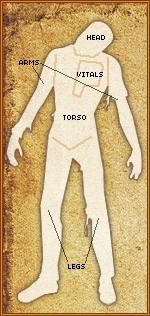
The damage multiplier for body area varies based on which area is hit. There are five key areas used for the system here on Biohazard, each has their own unique damage multiplier and some of the others also have unique effects that happen along side the damage dealt to hit points that can quickly change the tide in combat. Below you will find a brief breakdown of each of these body areas, their damage multipliers, and secondary effects explained.
~~~~~~~~~~~~~~~~~~~~~~~~~~~~~~~~~~~~~~~~~~~~~~~~~~~~~~~~~~~~~~~~~~~~~~~~~~~~~~~~~~~~~~~~~~~~~~~~~~~~~~~~~~~~~~~~~~~~~~~~~~~~~~~~~~~~~~~~~~~~~~~~~~~~~~~~~~~~~~~~~~~~~~~~~~~~~~~~~~
›› ( Head ) ›› Head shots have no area damage multipliers, any creature unfortunate enough to be shot in the head is killed instantly.
~~~~~~~~~~~~~~~~~~~~~~~~~~~~~~~~~~~~~~~~~~~~~~~~~~~~~~~~~~~~~~~~~~~~~~~~~~~~~~~~~~~~~~~~~~~~~~~~~~~~~~~~~~~~~~~~~~~~~~~~~~~~~~~~~~~~~~~~~~~~~~~~~~~~~~~~~~~~~~~~~~~~~~~~~~~~~~~~~~
›› ( Torso ) ›› Torso shots have a x2.5 area damage multiplier and do not have any immediate harmful secondary effects.
~~~~~~~~~~~~~~~~~~~~~~~~~~~~~~~~~~~~~~~~~~~~~~~~~~~~~~~~~~~~~~~~~~~~~~~~~~~~~~~~~~~~~~~~~~~~~~~~~~~~~~~~~~~~~~~~~~~~~~~~~~~~~~~~~~~~~~~~~~~~~~~~~~~~~~~~~~~~~~~~~~~~~~~~~~~~~~~~~~
›› ( Vitals ) ›› A strike to the vitals has a x4 multiplier and will render any human incapacitated until treated, failure to do so will cause death.
~~~~~~~~~~~~~~~~~~~~~~~~~~~~~~~~~~~~~~~~~~~~~~~~~~~~~~~~~~~~~~~~~~~~~~~~~~~~~~~~~~~~~~~~~~~~~~~~~~~~~~~~~~~~~~~~~~~~~~~~~~~~~~~~~~~~~~~~~~~~~~~~~~~~~~~~~~~~~~~~~~~~~~~~~~~~~~~~~~
›› ( Arms ) ›› Arm shots have a x1.5 area multiplier and will render the arm hit useless until treated (roll to see which arm is hit).
~~~~~~~~~~~~~~~~~~~~~~~~~~~~~~~~~~~~~~~~~~~~~~~~~~~~~~~~~~~~~~~~~~~~~~~~~~~~~~~~~~~~~~~~~~~~~~~~~~~~~~~~~~~~~~~~~~~~~~~~~~~~~~~~~~~~~~~~~~~~~~~~~~~~~~~~~~~~~~~~~~~~~~~~~~~~~~~~~~
›› ( Legs ) ›› A shot to the leg has a 2x multiplier and will cut the speed of the target in half until the wound has been properly treated.
~~~~~~~~~~~~~~~~~~~~~~~~~~~~~~~~~~~~~~~~~~~~~~~~~~~~~~~~~~~~~~~~~~~~~~~~~~~~~~~~~~~~~~~~~~~~~~~~~~~~~~~~~~~~~~~~~~~~~~~~~~~~~~~~~~~~~~~~~~~~~~~~~~~~~~~~~~~~~~~~~~~~~~~~~~~~~~~~~~
DAMAGE EXPLAINED
Damage taken from gun based attacks varies greatly based on two main factors. The first factor is the type of firearm used and by association the type of ammunition that gun fires. The second factor is where on the body your bullet strikes, as different parts of the body deliver different damage multipliers. Below you will find the formula for gun based attack damage.
›› ( formula ) ›› ammo damage x area multiplier = damage dealt.
~~~~~~~~~~~~~~~~~~~~~~~~~~~~~~~~~~~~~~~~~~~~~~~~~~~~~~~~~~~~~~~~~~~~~~~~~~~~~~~~~~~~~~~~~~~~~~~~~~~~~~~~~~~~~~~~~~~~~~~~~~~~~~~~~~~~~~~~~~~~~~~~~~~~~~~~~~~~~~~~~~~~~~~~~~~~~~~~~~~~~~~~~~~~~~~~~~~~~~~~~~~~~~~~~~~~~~~~~~~~~~~~~~~~~~~~~~~~~~~~~~~~~~~~~~~~~~
HIT PERCENTAGE TABLE
The table below is the first Biohazard roll table, this table is used to determine if a bullet strikes the target it was fired at based on the users overall training with the firearm in use.
~~~~~~~~~~~~~~~~~~~~~~~~~~~~~~~~~~~~~~~~~~~~~~~~~~~~~~~~~~~~~~~~~~~~~~~~~~~~~~~~~~~~~~~~~~~~~~~~~~~~~~~~~~~~~~~~~~~~~~~~~~~~~~~~~~~~~~~~~~~~~~~~~~~~~~~~~~~~~~~~~~~~~~~~~~~~~~~~~~~~~~~~~~~~~~~~~~~~~~~~~~~~~~~~~~~~~~~~~~~~~~~~~~~~~~~~~~~~~~~~~~~~~~~~~~~~~~~~~~
| User Level |
Dex 1-8 |
Dex 9-11 |
Dex 12-14 |
Dex 15-17 |
Dex 18-20 |
| Level 1 |
10% (1-2) |
15% (1-3) |
20% (1-4) |
25% (1-5) |
30% (1-6) |
| Level 2 |
15% (1-3) |
25% (1-5) |
30% (1-6) |
35% (1-7) |
40% (1-8) |
| Level 3 |
25% (1-5) |
35% (1-7) |
40% (1-8) |
45% (1-9) |
50% (1-10) |
| Level 4 |
35% (1-7) |
40% (1-8) |
50% (1-10) |
60% (1-12) |
65% (1-13) |
| Level 5 |
45% (1-9) |
50% (1-10) |
60% (1-12) |
70% (1-14) |
75% (1-1) |
~~~~~~~~~~~~~~~~~~~~~~~~~~~~~~~~~~~~~~~~~~~~~~~~~~~~~~~~~~~~~~~~~~~~~~~~~~~~~~~~~~~~~~~~~~~~~~~~~~~~~~~~~~~~~~~~~~~~~~~~~~~~~~~~~~~~~~~~~~~~~~~~~~~~~~~~~~~~~~~~~~~~~~~~~~~~~~~~~~~~~~~~~~~~~~~~~~~~~~~~~~~~~~~~~~~~~~~~~~~~~~~~~~~~~~~~~~~~~~~~~~~~~~~~~~~~~~
BODY AREA TABLE
The table below is the second Biohazard roll table, this table is used to determine the likelihood of a firearm users chance to hit body areas. When firing a player can choose to swap their head shot percentage with any other body area to ‘aim’ at the most desired place for them.
~~~~~~~~~~~~~~~~~~~~~~~~~~~~~~~~~~~~~~~~~~~~~~~~~~~~~~~~~~~~~~~~~~~~~~~~~~~~~~~~~~~~~~~~~~~~~~~~~~~~~~~~~~~~~~~~~~~~~~~~~~~~~~~~~~~~~~~~~~~~~~~~~~~~~~~~~~~~~~~~~~~~~~~~~~~~~~~~~~~~~~~~~~~~~~~~~~~~~~~~~~~~~~~~~~~~~~~~~~~~~~~~~~~~~~~~~~~~~~~~~~~~~~~~~~~~~~~~~~
| User Level |
Head |
Torso |
Vitals |
Arms |
Legs |
| Level 1 |
5% |
40% |
10% |
15% |
30% |
| Level 2 |
10% |
35% |
15% |
10% |
20% |
| Level 3 * |
20% (1-20) |
30% (21-50) |
20% (51-70) |
10% (71-80) |
20% (81+) |
| Level 4 |
35% |
25% |
25% |
5% |
10% |
| Level 5 |
50% |
10% |
25% |
5% |
10% |
|
|
SECTION NAVIGATION
Below you will find easy section navigation for
all of the pages listed in the guidelines section.
~~~~~~~~~~~~~~~~~~~~~~~~~~~~~~~~~~~~~~~~~~~~~~~~~~~~~~~~~~~~~~~~~~~~~~~~~~~~~~~~~~~~~~~~~~~~~~~~~~~~~~~
›› ( visit ) ›› Player Attributes
~~~~~~~~~~~~~~~~~~~~~~~~~~~~~~~~~~~~~~~~~~~~~~~~~~~~~~~~~~~~~~~~~~~~~~~~~~~~~~~~~~~~~~~~~~~~~~~~~~~~~~~
›› ( visit ) ›› Combat Mechanics
~~~~~~~~~~~~~~~~~~~~~~~~~~~~~~~~~~~~~~~~~~~~~~~~~~~~~~~~~~~~~~~~~~~~~~~~~~~~~~~~~~~~~~~~~~~~~~~~~~~~~~~
›› ( visit ) ›› Item Information
~~~~~~~~~~~~~~~~~~~~~~~~~~~~~~~~~~~~~~~~~~~~~~~~~~~~~~~~~~~~~~~~~~~~~~~~~~~~~~~~~~~~~~~~~~~~~~~~~~~~~~~
›› ( visit ) ›› Skills Introduction
~~~~~~~~~~~~~~~~~~~~~~~~~~~~~~~~~~~~~~~~~~~~~~~~~~~~~~~~~~~~~~~~~~~~~~~~~~~~~~~~~~~~~~~~~~~~~~~~~~~~~~~
HAVE A QUESTION?
If you have a question pertaining to anything you read on this page and wish for an explanation from management then feel free to visit the ( Questions Board ) and someone will do their best to answer your question in as much detail as possible. |